What The Hay

Crafty Hayseed Goodness!

Crib Sheet Tutorial October 8, 2008

Filed under: free pattern,projects,thrifted — clothespin @ 9:21 am
Tags: ,

Rosie’s Crib Sheet Tutorial

by Jeannie

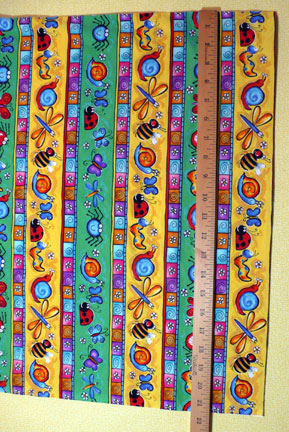
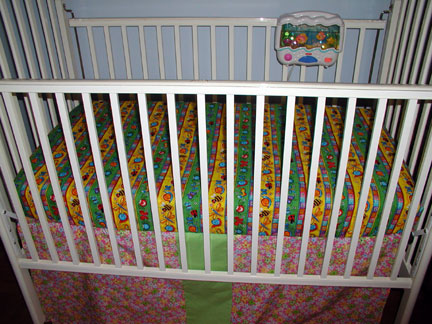
Finished crib sheet in Rosie's bed

After finding out that we were pregnant with our first baby, I began the long and fun process of collecting all of the things that a new human needs to survive. First on the list? A CRIB of course! Beyond the crib (which we found at a consignment sale, along with the crib mattress) a baby needs crib sheets. Happily, Rosie has a talented grandma who was more than happy to provide her with many of the essentials of baby survival – a quilt (with strict instructions to USE it), a few totally cute outfits and 4 crib sheets.

Rosie’s Grandma is a sewing kind of lady and back when I was a kid, money was tight and so, well, she sewed. Beyond making nearly all of our clothes that weren’t hand-me-downs, she also devised a pattern for a crib sheet. Back in the day, people actually made their own sheets for their big beds, too, and she adapted this pattern from one of those patterns.

The pattern is easy, suitable for a beginning sewer, and takes about 1 hour, or several days if you already have a baby who doesn’t like to sleep. Not that I know anything about that at all… What you will need for equipment is a basic sewing machine capable of doing zig-zag and straight stitches, an iron and ironing board and a few basic sewing things, like pins and scissors. For fabric, you can buy new fabric from any fabric store OR do the environmentally correct (and infinitely cheaper!) thing and repurpose an old grown up sized bed sheet. (Or even more fun, take one of your old childhood sheets and make your baby a sheet out of that!) Flannel sheets for a crib could be wonderful, too, especially for winter babies!

Fabric from the store generally runs anywhere from $2-8/yard… If you’re going to Hobby Lobby, Joanns or Michaels, make sure you use one of their nifty coupons to get 40% off the fabric price. Walmart has fabric too, but in general, it’s thinner and won’t make as nice of a sheet. Of course, the best thing to do if buying new fabric is to support locally owned fabric shops!

Used bed sheets, on the other hand, can be free (from your own closet) or about $1 per sheet. I find them at thrift stores and garage sales… One hint on thrifted sheets – If, like at my Salvation Army thrift store, they fold the sheets up and tape them shut with masking tape – un-tape them and check out the middle. I’ve found several sheets that looked nice and pretty folded up only to be pretty ookey in the middle. Check out the chart in the instructions to see about how many crib sheets you can get out of an adult sized sheet.

Either way, PLEASE be sure to pre-wash and dry your fabric before making this for your baby! Wash in hot water and dry on hot to make sure that it shrinks as much as it is going to and to eliminate any excess dyes or cooties that might harm the baby. Cooties especially from thrifted sheets because, well, you know what happens on sheets, just saying…

Materials:

  • Fabric from store – 2 yards

OR

thrifted sheet

  • 3 yards (1 package) of ¼ inch stretch elastic, part cotton part rubber

  • thread to match the fabric

  • cardboard to make pattern, about 12 inches square (an old pizza box works great!)

  • scissors, yard stick…

Steps:

For Store bought fabric:

Fold fabric in half lengthwise. It doesn’t matter if the fabric is wrong or right sides together – either will work fine. Lay the fabric rectangle out flat on your cutting surface (in my case, my kitchen table). Make sure edges are aligned, the selvages should be on the long edges.

Cut the fabric on the end so that this edge is straight, forming a 90 degree angle with the long edge. I use my rotary cutter, ruler and mat, but you can also line it up with something you know is square, like the tiles on your kitchen floor, and cut it with regular fabric scissors.

Measure the fabric on the short side using a yard stick or tape measure and double this – this is the width of your fabric. Find the width of your fabric in the chart below and note the length given below it. This is how long you will cut your fabric.

* All measurements below are in inches!

width – of fabric

41

42

43

44

length – of fabric

66

67

68

69

square size

7

7.5

8

8.5

Measure the fabric to the length indicated and again, cut the fabric so that it is square. For example, if my fabric is 43 inches wide, I will cut my fabric to a length of 68 inches.

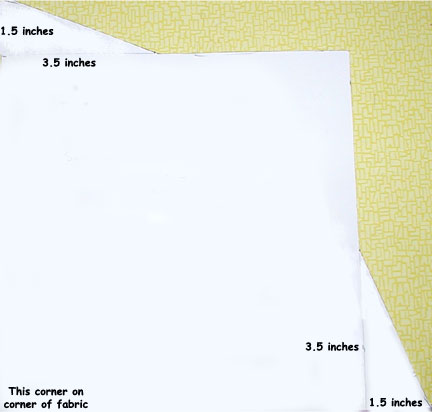
*** Using the chart, select the correct pattern size to cut out. To make the pattern, on your pizza box, draw a square of the appropriate size (8 inches for a 43 inch wide fabric), then add the triangles to the corners. The triangle should be 1.5 inches wide and 3.5 inches tall. Refer to the picture below for reference.

Cut out the paper pattern and place it on one corner of your rectangle of fabric with the wings of the pattern along the edges of the fabric. The folded edge of the fabric should be at the top and the two open corners at the bottom. Use a pen that writes on fabric (any pen will do, even a sharpie) and trace around your pattern. Repeat this process at the other end of the fabric rectangle.

Cut out both layers of fabric following the traced lines. Save this scrap fabric for later craftiness.

Unfold your fabric – it should look like this with the four corners missing.

FOR THRIFTED SHEET FABRIC

To maximize the number of crib sheets that you can get out of one adult sheet, you’re going to have to do a bit of layout vizualizing. I personally have made a large pattern using the back side of wrapping paper, but newspaper will work just as well. Then, I laid it out on the sheet before doing any actual cutting. To make a newspaper pattern, tape together sheets of paper and then meaure out a rectangle 43 by 68 inches. The 43 inch wide size is probably the better size as it allows for more fabric to fold under the crib mattress after the sheet is made, but if it doesn’t fit, try the 41 inches out, it works just as well.

Cut out the newspaper rectangles and place on your sheet (which is probably on the floor) and manuever around until you can maximize the number of crib sheets cut out. As sheets do vary a bit in size, it’s hard to give for sure estimate but… the chart below should give you an idea of how many crib sheets you might get out of an adult sheet (and this is an estimate, I havn’t tried all of the sheet sizes). Also, if there is any particular design that you want centered on the crib sheet (or stains that need to be avoided), now is the time to do so, just be sure to keep the edges all straight with the grain (edge) of the fabric. You can then pin the pattern to the sheet and cut out along the edge.

fitted – standard size

number of crib sheets from fitted

flat – standard size

number of crib sheets from flat

Twin

39 x 75

0

66 x 96

2

Twin XL

39 x 80

0

66 x 102

2

Double

54 x 75

1

81 x 96

2

Queen

60 x 80

1

90 x 102

2

King

76 x 80

1

108 x 102

2

Cal King

72 x 84

1

102 x 110

2

* Fitted sheets are cut open at the corners and laid flat before cutting into crib sheets.

Once you have your sheet fabric rectangle cut out, fold it in half lengthwise and then follow the directions starting at *** for store bought fabric. Any leftover sheet fabric can be made into fab sheet shopping bags!

SEWING

To turn this flat fabric into a sheet, first we have to make the corners. Take one corner of your fabric rectangle and fold WRONG SIDES together, matching the points of the triangle, A to A, B to B.

This is what it should look like folded after matching the points.

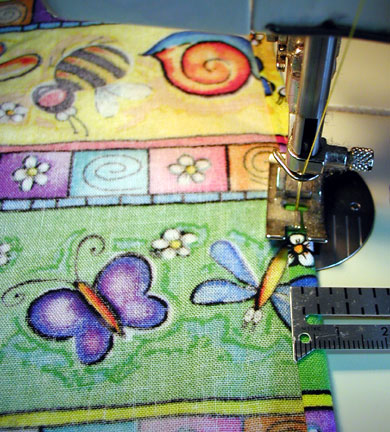
Using a straight stitch, sew a scant ¼ inch seam.

Repeat on the remaining 3 corners making sure that they are all wrong sides together.

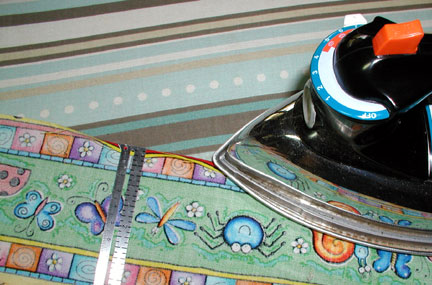
Turn the corners inside out and iron with your steam iron.

Again, sew the same seam, this time with a full ¼ inch seam – the fabric will now be right sides together. There should now be a seam without any raw edges – so no fraying of the fabric!

You should now have what looks like a fitted sheet, just lacking the elastic.

Next, iron the edge of the sheet ¼ inch up all around.

Fold the fabric edge over again and sew with a straight stitch all around – again, resulting in no raw edges. At the corners, don’t worry if it looks a bit wonky – the elastic that will go here will cover it up and no one will ever see or notice (or care!).

Measure on the long side from each corner 15 inches and place a stick pin at this point. It doesn’t have to be exact, just a rough idea. You should have 4 pins in the sheet, two on each long side with a space in the middle.

Set your sewing machine to zigzag and have the stitch be wide and long (how to do this will depend on your machine, check the owners manual if you don’t know). Take the elastic, place it on the inside of the sheet at the top of the seam and zigzag it back and forth about ½ inch at the point of one pin, with the elastic going towards a corner (and not towards the middle of a long side). This will anchor the elastic to the fabric.

Pull the elastic fairly tight, hold it along the seam edge and zigzag sew the elastic onto the fabric. The fabric will scrunch up behind the stitching.

Sew around the corner and to the next pin. Sew back and forth a couple of times to anchor this end. Cut your thread and elastic and repeat at the other end.

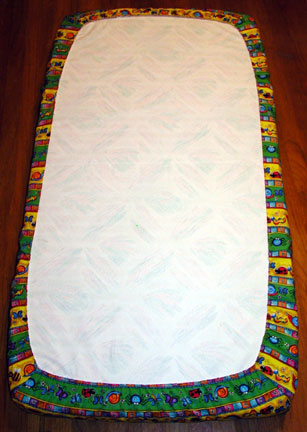
Place your new sheet on a crib mattress to check for fit – this is a picture of my sheet upside down on the mattress.

Now, cross your fingers, wiggle your nose and hop three times on your right foot while singing a sweet lullaby and place your baby onto its new fab sheet – you just might get her to sleep!

Like this pattern? Download a PDF version of the pattern crib-sheet-tutorial!

Creative Commons License

Rosie’s Crib Sheet Tutorial by Jeannie Jessup is licensed under a Creative Commons Attribution-Noncommercial-Share Alike 3.0 United States License.
 

Rag Sponge May 20, 2007

Filed under: environment,free pattern,projects — clothespin @ 4:55 pm

I hate dishes. Well, I actually hate doing dishes. The dishes themselves are fine, and even pretty on occasion.

done.jpg

Part of my reluctance is the icky dishrag. (Or dishcloth for those of you too good to use a rag.) I grew up with dishrags and never liked them. They flopped and dripped and were just icky. But, they were washable and lasted a long time. Still, didn’t counter the ick part.. SO – when I grew up, I became a kitchen sponge girl.

Couple of negatives with sponges. First, you have to buy them. Not good on a student budget. They also tend to stink after a while, which can mean nothing good as far as bacteria in the kitchen go. Recent brianiac scientific news reports educated the masses with the stunning information that heating a wet sponge in the microwave for 2 minutes will kill all of the nasties… Some people obviously think that this is too laborious, and just throw out the sponges and start over. Having issues with throwing out things that are otherwise fine, this wasn’t working for me.

In an effort to combine washability with cheap with environmentally friendly with sponge… I came up with the following idea. It’s easy to make and takes only pennies of supplies – so cheap in fact, I plan on having lots of these so that I can use several in a week. Then, when laundry day hits – throw them all in the wash with some borax powder and laundry soap! The result will be clean, bacteria free kitchen sponge rags! (Though, due to their thickness, I would suggest drying them in the dryer unless you live where hanging them out to dry goes really quickly…)

Materials:

old washcloth or towel, terry cloth type

heavy weight sew in interfacing, 1/8 inch thick

afghan fabric, or other open weave heavy type fabric***

*** I got this for about $3/yard at Hobby Lobby on a bolt in the fabric section. It is nylon and has about 6 holes to the linear inch. They told me it was afghan fabric, but I have not been able to find anything like it on line. If you know what this is really called, please let me know!

*** You could also use the net plastic bags from around oranges and onions or thin rug hooking canvas. I also found this needlepoint canvas which would probably work, though you might need to sew down the middle each way to stabilize it.

Directions:

1) Cut towel into a 9×10 inch size. If your wash cloth is that size already, perfect. Zig-zag the edges if using a towel (or serge the edges if you are lucky enough to have a machine!)

rag.jpg


2) Cut a 3×4 1/4 inch piece of the heavy interfacing. Center this in the middle, on the lower edge of the 10 inch wide part, of the washcloth, placing about 1/4 inch above the edge. Pin.

pin-middle.jpg


3) Zig-zag around the edge of the interfacing.

zig-zag-middle.jpg

4) Fold the washcloth over the interfacing as shown in the picture.

half-fold.jpg

5) Fold one side over the top of the interfacing section, the other under the bottom, creating an “s” around the interfacing.

s-fold-top.jpg

s-fold1.jpg

6) Cut a 3 1/2 x 5 inch piece of the mesh. Place over one side of the cloth. Pin.

7) Slowly zig-zag around the edge of the mesh, making sure to catch all of the edges of the cloth as you go. It will be very thick, so take it slow. If you don’t get all of the edges, sew another line down to catch them all.

done.jpg

8) Go do your dishes!


Creative Commons License

This
workis
licensed under a

Creative Commons Attribution-Noncommercial-Share Alike 3.0 United
States License
.


Scalloped Right Angles Dishcloth May 1, 2007

Filed under: free pattern,projects — clothespin @ 10:00 am

I knit at lunch at work. And while I work in the agronomy department where you might think that normal farm type things would be seen as normal, my lunch time activity draws a small bit of attention. So far as I know, there is only me and a newly converted to knitting grad student who knit in public. And she won’t knit with me at luch (but we did once during a seminar!)

Lunch time projects are important – a nice break from the lab or writing and I get something done in that little bit of time. So, small easy, mindless projects are the first choice. Dishrags are one of my favorite in that category. (Plus, they’re good to keep made up in the stash as emergency gifts!)

dish-rag.jpg

I had a ball of yarn that I got on clearance at a yarn store, mainly cotton I think, and knit this pattern for a right angles dishcloth. Really cute and easy and worked up fast – it is a great pattern for lunch time!

The problem? It was really small. By the time I realized this, I was unwilling to rip it out, so finished it off and pondered what to do next. Crochet of course!

edge.jpg

Scallops to the rescue! With just enough yarn in the ball to give two rounds of the stitch, it made the cloth just the right size to be a respectable dish cloth. A nice adaptation of the original pattern, it also nicely takes advantage of both forms of yarn manipulation that I happen to love.

Directions:

Make the Right Angles Dishcloth in the pattern linked above.

Keep one loop and take an appropriately sized crochet hook (I used a size G hook with the size 8 needles) and chain 1.

Round 1: Single crochet evenly all around the square, putting 3 sc in each corner stitch. Join with a slip stitch to first sc.

Round 2: Chain 3. This will act as your first dc. Dc in same space, chain 2, sc in same space. *Skip next two sc, in next sc (2 dc, chain 2, sc).* Repeat between * all around the block. Join with a slip stitch to top of chain 3.

Round 3: Slip stitch over the dc to chain 2 space from round 2. Chain 3 (will count as first dc) and (dc, chain 2, sc) in same chain 2 space. In next chain 2 space, *2dc, chain 2, sc*. Repeat between * all around block, joining with a slip stitch to chain three from start of round.

Around the corners, if a scallop was going over it, I might add a chain stitch between the sc and dc to lengthen the edge – will help keep the fabric from curling over. Don’t worry about where the scallops fall – I add libbed the end and made the pattern work for the stitches that I had. This is a dishrag after all!

If you have any questions, please let me know. Enjoy!


Creative Commons License

This
workis
licensed under a

Creative Commons Attribution-Noncommercial-Share Alike 3.0 United
States License
.


Altoids Tin Needle Holder March 23, 2007

Filed under: free pattern,Needle Holder — clothespin @ 3:10 pm

Altoids tins are amazing. One evening, a fellow yarn addict and I, after a stitchy meeting, were chatting about yarn needles and how easy it is to loose the little things. They’re small, it’s hard to stick them into a ball of yarn without feeling like you’re looking for the proverbial needle in the haystack… and the worst thing is – when you need it, you can’t find one. I have no idea of how many yarn needles I have lounging around in various bags of yarn in various projects. Occasionally, after a crazed closet and stash dive, I will run across one of my long lost needles. I then dutifully put it in a “safe” place, maybe to use it one more time and then never for it to be seen again – or at least until I move.

Anyways, back to my friend and I chatting… she was digging around in her yarn bag to find the slippery needle and managed to find instead – an Altoids tin. A light bulb went on (CFL type, thank you!) and I happily went home, tin in hand, with a promise to return to her a magical item. A magnetic needle holder. Yes, it is still very possible to loose this in the yarn stash or car and perhaps even the couch cushions, but at least it won’t hurt as bad when sat upon and it might be a bit harder to loose.

Materials:

Altoids Tin – big enough to easily place needles into altoids tin

magnet – This can be the type bought from the craft store with a sticky backing OR an old pizza shop magnet off of your refrigerator

glue – only if recycling and using the pizza magnet

scissors, paper, pen

1. Open and eat a few of the Altoids, removing the rest to a bowl or other storage container. (The chocolate covered Altoids are really yummy, I know this despite hubby reminding me that chocolate triggers my migraines… I only ate one!)yummy

2. Trace around the base of the tin on a scrap piece of paper. Cut this out and then place inside of the tin. Retrace again (it will be slightly smaller) to get a good fit. Trim edges.

Retrace paper pattern

3. Take your new paper pattern and place onto the magnet. Trace this onto the paper side of the magnet, sticky type or pizza shop type, doesn’t matter. Trace the shape out onto the paper and then cut this out carefully.

tracing magnet

4. Place cut out magnet into tin, marking on the edges where a bit more trimming is needed.

Magnet test

If you’re using the sticky backed magnets like I did, now is the time to peel the paper off!

Peeling off the sticky paper

My paper was hard to pull off, so use some of those muscles. If you’re recycling (you’re such a good kid!) place the glue of your choice onto the paper side of the magnet. For either one, place sticky side down into the tin, pressing firmly to ensure contact of glue and tin. (If you’re a recycler, you might need to add some weight inside the tin.) Let dry. Magnet in

5. Give it a test run! Find your long lost yarn needle, sewing needles, quilt pins or paper clips and stick them on your magnet. Depending on their weight, most will stay put just fine (though those quilting needles in my picture were only mildly interested in staying put).

Finished needle holder!

6. Make them and give them to your pals! I made a couple of these for my MIL and SIL before a quilt show and then returned the paper lining and mints (well, most of them) to the tin and gave it to them as a pre-show gift. These would work great for door prizes for quilt groups, Stitch n Bitch groups or even your grandma! Enjoy!


Creative Commons License

This
workis
licensed under a

Creative Commons Attribution-Noncommercial-Share Alike 3.0 United
States License
.